| |
 |
|
Icon Converter
DESCRIPTION
- Allows you to load an image, likely bmp, png, or jpg (gif
and tif also work) and then convert it to an icon size you
wish - and then to save it.
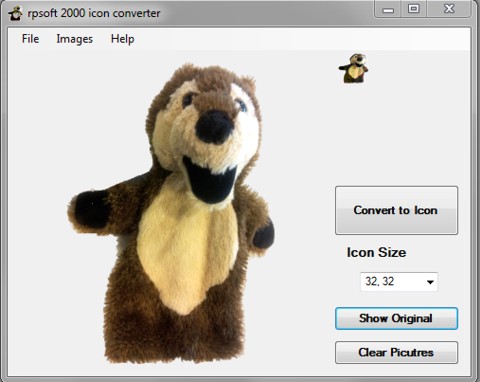
1. Step 1:
Use the “File” drop down menu on the far left top and select
to load a picture file, such as bmp, png, jpg, gif, tif,
jpeg. Image shown in large area. Best if the image is
mostly square, since icons are square.
2. Step 2: Select
icon size. “32, 32” is likely the most common. Icons will
often resize their image if a program uses a different size.
I use “128, 128” for large screen icons even though they
shrink, and use “32, 32” for programs
3. Step 3: Press
the “Convert to Icon” button with a left mouse click. In the
upper right it will show an image of the icon created its
size and quality. The main image will show the impact of
size change (more blurry).
4. Step 4: Use
“File” drop down menu to save the made icon to disk
5. Option: “Show
Original” shows the original pic quality. Note that if you
do two different icon sizes, the saved original quality is
again used for the conversion. |
|
|
|
Click here to view some common applications (usage) and also for
some hints on images/drawing packages
OPTIONS / DEFINITIONS
Buttons
- Convert to Icon - Does
the real work. After an image is loaded, clicking this
button converts the image to an icon. It will then show
the resultant size (icon size you set before) and quality in the
small image area. It will show the effects of size
reduction and quality loss on the main larger image as well,
unless you then press the "Show Original" button
- Show Original - After
converting the original image to an icon, the larger image will
also show how blurry the image really is at the smaller size.
Pressing this button with a left mouse click returns the
original saved image. Note that the saved original image
is also returned briefly if you decide to "Convert to Icon"
again, to ensure best picture quality.
- Clear Picture -
Optional - for the two picture images shown. Will not
erase the stored original image if used again.
Option Box (arrow on
far right allows drop down items inside that can be selected)
- Icon Sizes - Should be
set before pressing the button "Convert to Icon" since it tells
the system what size and therefore what quality the image should
be. Size " 32,32" for an icon is likely its normal size
for use with a program. It is the value I use for
programs. I use " 128,128" for large screen icons even
though the image size will be reduced by my screen. Note
that icon images will often try and change for size allowed by a
program. But of course, quality may not return if its size
is increased. " 16,16" seems to be in usage for some file
managers, as our own filemanager2 that show icons next to file
names. "24, 24" is used by some programs for other usages.
Our filemanager2 uses " 24,24" for the optional program icons at
top for fast startup. Some other sizes are also provided
as options in the drop down box.
Upper Drop Down Area Options
There are options under "File" for loading
the original image. Picture types allowed are: jpg, jpeg, bmp. gif,
tif, png, ico, wmf, cur, emf and dib. We suggest using "png"
type with transparency already inherent in the file if transparency
is desired. Under "File" of course is also the option to
save the icon results. Help includes a help file.
"Images" do the same as 2 buttons shown.
SPECIFICATIONS
- Picture Formats
That Can be Loaded: jpg, jpeg, bmp. gif, tif, png, ico,
wmf, cur, emf and dib. Note that there is an option for
"Loading from Clipboard" also, that might allow you to save to
clipboard an even different file type done in another program.
I did not test this. But it would seem that the clipboard
does not ask me what file type to save, therefore it likely
saves "all bits" like a bmp bitmap but also does save
transparency somehow.
- Icon Sizes (choose
before conversion) - 16x16, 24x24, 32x32, 36,36, 48x48, 64x64,
96x96, 128x128\
- Transparency - Can be
used for icons if inherent in the image loaded. We tested
png format with good results. We tested one gif sample
with transparency already in the gif file before saved. It
also worked well.
|
|
